A woman who I take TaeKwanDo with is expecting her 2nd munchkin in the very near future. We're having a small get-together for her on Friday so this is the card I made for her.
Ingredients:
Paper: Stampin' Up
Stamps: Unity (Boat), Stampin' Up (Banner)
Colors: Black Momento, Watercolor Pencils, Brilliant Blue Stampin' Up (edges)
Challenges:
SEI: Colors
Unity: Friends with Flair (I'm entering this on the 16th because I TOTALLY missed it last week!)
Wednesday, May 7, 2014
Mother's Day cards
I usually try to make 2 completely different cards for my mother and MIL. This wasn't one of those years. While I did make one image a bit darker than the other and the background paper a bit of a deeper pink on one, that was it, those were the differences this year.
Stamp: LaBlanche
Papers: Stampin' Up
Coloring: Copics
Embossing folder: Stampin' Up
Challenges:
Simon Says Stamp: Spring Flowers
Paper Players: Mother
SEI: Color Combo
Just Us Girls: Sketch
Sunday, May 4, 2014
Simple Sympathy card
Unfortunately we need a sympathy card so I used the great "...may hope sustain you" set from Unity for it.
Ingredients:
Papers/Ink: Stampin' Up (colored with SU inks from the lids with a blender pen)
Stamps: Unity
Misc: Clear rhinestone colored with black Copic
Challenges:
SEI: Color Challenge
Unity: Friends with Flair
Ingredients:
Papers/Ink: Stampin' Up (colored with SU inks from the lids with a blender pen)
Stamps: Unity
Misc: Clear rhinestone colored with black Copic
Challenges:
SEI: Color Challenge
Unity: Friends with Flair
Saturday, May 3, 2014
Big Day layouts
Happy (Inter)National Scrapbooking Day! Yeah. It's almost 10pm here on the east coast but it's still today and it's the thought that counts. Right?
I picked up a BG scrapbooking kit at my LSS quite a while back. I'm generally not a kit person but I loved the colors and patterns in this one and it WAS on sale after all! Had to have it. So it's been hanging around with a lot of other stuff and I really needed to get it done so I made it my goal for today- use the kit. I altered the included sketch slightly and then made a 2nd 2-pg layout out of the leftovers which worked well since it took 4pgs to get all of my pictures in.
I hope that you have a chance to do a bit of scrapping today and in the days to come. I'll be posting this over at Big Picture Classes NSD10k and at Moxie Fab's Scrapbooking Rocks challenge. Hope you'll join me!
Thursday, February 13, 2014
Calm Before the Storm Layout
I generally don't do more than a 2 page spread for an event but it looks like I'll have 5 Imagination Movers pages by the time it's all said and done. I definitely had to do a page about how calm our son was before the show and how he completely lost it during the show. This one is tied to the Write, Click, Scrapbook Scrapolympics, Day 3. The event was Freestyle- basically show something that's your normal style. My style tends to be simple, not overly embellished, and lots of photos. This one only has 4 photos which is a bit light but it's what I had. I definitely broke out the Thickers which is a norm and did a decent amount of hand journalling. I frequently layer papers - this time I used crayons to shade behind my photos. In a lot of ways, other than multiple photos, my style is I don't have much of a style- it depends on the photos, how I trim them, how they fit, etc.
Opening Act Layout
I'm VERY overdue in finishing layouts about our 2011 Imagination Movers concert experience. Of course, in the process of digging out what I needed to finish one of these layouts, I found 3 other projects that I've either started and wanted to finish or never started but really would like to get moving. Of course, that's in addition to the Disney album and 100's of photos I haven't scrapped yet from lots of events but one thing at a time. Movers.
I designed this one along the challenge lines set up by Write, Click, Scrapbook's Scrapolympics, Day 1. I actually used a color palette and sketch shown in one of the samples though the color was a fluke. I went digging through their site looking for a color palette I liked for these photos, selected one and just now, when putting this post together, realized it's the same one that Marnie used for the her page, using the same sketch I used. Cue creepy music.
Aug. 2013 sketch:
Oct. 2013 Color Palette:
Sunday, February 9, 2014
Hot air love
This is my last Valentine's Day card... for today. I still need to finish one for the pipsqueak.
This was another case of a card I saw and loved from Bosenberries.
All materials except the embossing folder (Darice) are from Stampin' Up.
Challenges:
Simon Says Stamp: Have a Heart
The Stamping Boutique: CAS
This was another case of a card I saw and loved from Bosenberries.
All materials except the embossing folder (Darice) are from Stampin' Up.
Challenges:
Simon Says Stamp: Have a Heart
The Stamping Boutique: CAS
Mosaic Madness Hearts
I've used the Mosaic Madness punch for Christmas and now for Valentine's. I wonder if I could squeak off something for every holiday.
Everything is from Stampin' Up.
Challenges:
Paper Girls: Love Your Love
Shopping Our Stash: This embossing folder has been in my stash for about 2 years and never used that I can think of.
Simon Says Stamp: Have a Heart
Everything is from Stampin' Up.
Challenges:
Paper Girls: Love Your Love
Shopping Our Stash: This embossing folder has been in my stash for about 2 years and never used that I can think of.
Simon Says Stamp: Have a Heart
Row of Hearts
This is a card that I cased from my friend LeAnne Pugliese. I saw one of her Christmas cards and had to recreate it.
Challenges:
Paper Girls: Love Your Love
Simon Says Stamp: Have a Heart
Valentine's Day is upon us!
I'm going to make several quick posts with the Valentine's cards I've made. First up, I think this is my fav and will likely go to the hubster. Everything on it is a Stampin' Up product.
Challenges:
Paper Girls: Love Your Love
Shopping Our Stash: Love Me Tender (I've had the Lovely Little Labels stamps and punches for over a year... and hadn't even opened them I'm very embarrassed to say!)
Simon Says Stamp: Have a Heart
Stampotique: Heart in Your Art
The Corrosive Challenge: Feel the Love
Sunday, February 2, 2014
The final kickstart
Today's Smeared & Smudged Kickstart Your Art challenge is to create a blotted background. I started a bit differently than usual in that instead of rubbing my distress inks on the background, I just tapped the ink pads on the paper. Once I had a pretty good layer, I did rub a bit of Vintage Photo on it to fill in any open spots and to get a bit of a blend. From there, I spattered water, blotted it, and then used a bottle cap to put circular water rings on and blotted those. The stamped sentiment is from Close To Your Heart.
Again, many thanks to those of you who have stopped by and left comments. I wasn't able to respond to most of you since your email addy's aren't associated with your IDs and unfortunately, I haven't had a chance to get around to all of your blogs. Again, thank you!! Wonderful work all!
Saturday, February 1, 2014
Kickstart Your Art Day 6
Today Smeared & Smudged declared it to be Texture day.
There's a baby wipe I used to clean up ink and paint from day 1 glued and gessoed to the cardstock. There's black acrylic on that, crackle gel on that (which can bubble up in a very satisfying way if you put it on really thick and heat it even more) white acrylic dabbed on that. I didn't have a clue what to put on the page so I just started to doodle which for some reason turned into a large segmented box with strange tentacles. I think we'll leave it at that.
Friday, January 31, 2014
Kickstarting Day #5
Today over at Smeared & Smudged, it's all about using scrap paper to make your background. I have a file box next to my desk filled with folders of scraps, organized by color. The final file is full of print papers. I had no idea where I would go with this but I figured I'd see what I had and then what jumped at me. Turned out to be easy. It went something like this:
Open folder
2 great full-spectrum rainbow papers on top
Below, more striped papers with a range of colors
What goes with rainbows?
There's brown in here
Gesso will dull the brown
What goes with rainbows?
How do these papers look together on the base sheet?
What goes with rainbows?
Gold pots go with rainbows
Unicorns go with rainbows
Yeah. You get the idea.
Thursday, January 30, 2014
Kickstart Your Art Day 4
Today over at Smeared and Smudged, it's about growth. Of course, growth can be positive... unless you're sitting in my twisted little mind. In that case, not everything is about upward growth.
Ingredients:
Tweedle Dee/Tweedle Dum from Octopode Factory
TH Distress ink pads (Shabby Shutters, Peeled Paint, Peacock)
Watercolor pencils
Sharpie
Uniball white gel pen (Yeah, I went back and added a bit of white to that 2nd G after this photo was taken. yeah yeah yeah.)
Ingredients:
Tweedle Dee/Tweedle Dum from Octopode Factory
TH Distress ink pads (Shabby Shutters, Peeled Paint, Peacock)
Watercolor pencils
Sharpie
Uniball white gel pen (Yeah, I went back and added a bit of white to that 2nd G after this photo was taken. yeah yeah yeah.)
Wednesday, January 29, 2014
Get it on paper
My 6yr old doesn't listen to me. Not a word. I have to repeat instructions over and over. He came home early yesterday because of snow. He was off today. I just found out he's out again tomorrow. We got 1" of snow by the way. I miss NJ and how they can deal with winter weather. This up there is something you look at, shrug at and ignore because it's only one frickin' inch! Here, it shuts down cities. It shuts me in with a 6yr old who is driving me mad. Better to put it on paper than to take it out on anyone. I think I just found a reason for art journaling. Today's Smeared & Smudged theme is to use a lay-around item for the background.
I:
I:
- gessoed
- sprayed with Mr. Hueys (those buggers are a disaster if you haven't used them in a while!)
- decided that the drips that occurred because the bottle was clogged looked like lightning
- stamped circles on with 3 bottles (plastic seltzer, gesso, a glass water bottle that I got in the UK in 2004. I still have the bloody thing!) and going grey/night of navy ink
- drew/colored a cloud with copics/#2 pencil/micron pens
- micron-outlined my lightning
- wrote my frustration out
- if it were later in the day and he was in bed, i'd add "went to have a large glass of some adult beverage"
Tuesday, January 28, 2014
Day 2 of Kickstart Your Art
So. Day 2 of Smeared & Smudge's Kickstart Your Art.
First, thank you those who commented on your kind words. I really appreciate them.
Second, I realize that I was unintentionally not entirely honest. I actually meant to mention this yesterday but was just so happy to post that I'd done something artsy/craftsy again. I did dabble in mixed media one other time, for one day. While it wasn't much time, it was a rather... intense? significant? whatever event. Donna Downey's studio is only about an hour from here so I went down there the other year and took a one day class from her. In 6 hours or so, we made a 40 page mixed media "reference book." Essentially, every page had a different technique on it- using print paper, paper towels, cardboard, etc. as a background; using pan pastels, acrylics, India ink, etc. as a medium; gessoing before and after inking, etc. It was a one day crash course in mixed media techniques. The class was about 2yrs ago and I don't think I've used a single technique again before this week. It was interesting, informative, great reference, and just sort of showed me that it's not my type of thing to do on a regular basis. I like many of the results of mixed media- the "play" is wonderful but my left brain/right brain war (every time I take one of those "which side of the brain type of person are you, I pretty much land dead center), means that most of the time I color in the lines while making darn sure I don't break my crayons- not traits particularly valued in mixed media. I rarely share my art and craft supplies with my 6yr old- he'll mess them up. Of course, when I was 6, I still wouldn't share my art supplies with my friends because they'd mess them up. Had to have my art supplies but I didn't want them messed up. Stupid ongoing brain war. So. There's the truth behind my mixed media past.
Back to our regularly scheduled programming.
Today is all about hearts. I kinda want the edges of this darker but other than that, I think it's what I was going for.
Thanks to Tit for the visual reminder that book pages make great backgrounds.
Ingredients: gesso, TH distress ink pads, Copics, SU watercolor crayons
Monday, January 27, 2014
A slightly different direction for the day
Smeared & Smudged is having a week-long "kick-start your art" challenge to create themed art-journal pages. I don't art journal. I'm not even a big fan of the mixed media trend. However, I like the idea of trying something different and forcing myself to do something a bit creative every day. So. Out of my little box I pop.
Today's theme is: 3 PRIMARY COLOR DRIPS
Again, I'm not a mixed media artist so I figure it's more of a week to play with trying out techniques I generally don't use. So (please forgive the curl- I haven't flattened it yet)
I laid down swipes of 4 TH stains on white paper (I don't have a book for this but I might bind the papers together at a later date).
I used clear EP to lay the SU Medallion stamp on top.
I dripped red, blue and yellow heavily watered down acrylic paints down the page from the top edge.
After dry, I wiped the paint off the medallion with a baby wipe (glad I kept a pack of those around!)
"it's time to pull back the curtain" was written with a large silver paint Sharpie and to make it a bit more legible, I wrote it again on top of the silver with a thin black Sharpie.
Sunday, January 19, 2014
A new year, a new go?
Yeah. October. Last time I posted. Needless to say that my mojo just didn't come back as I'd hoped last year. So. Let's start with Merry Christmas, Happy Holidays, and Happy New Year. Always a good way to kick it off.
So. First thing I needed to do? Clean my desk and room. Part of my issue has been that I just don't want to work in my space- it's way too full/cluttered/badly laid out. I moved some things around to generally straighten and I cleaned up my desk. A part of that was overhauling what's in my storage cart next to my worktable. It had been boxes of projects- one for Dec. Daily (2012 mind you- I didn't even bother with 2013) and one for our trip to Disney (Jan 2013. Yeah. Way behind.) I put those elsewhere and instead put together a box of stamps I'd like to ink and my 6x6 paper pads since I never use them and want to get them in front of myself.
I used the challenge over on Inky Froggies as my launching point for color and the SEI January challenge for theme. While I'm not wild about the results, I experimented using my mica for the first time, inked the stamps for the first time, broke out my brayer and just simply made a card. I'm happy with all of those things! Yay!
So. First thing I needed to do? Clean my desk and room. Part of my issue has been that I just don't want to work in my space- it's way too full/cluttered/badly laid out. I moved some things around to generally straighten and I cleaned up my desk. A part of that was overhauling what's in my storage cart next to my worktable. It had been boxes of projects- one for Dec. Daily (2012 mind you- I didn't even bother with 2013) and one for our trip to Disney (Jan 2013. Yeah. Way behind.) I put those elsewhere and instead put together a box of stamps I'd like to ink and my 6x6 paper pads since I never use them and want to get them in front of myself.
It may not look like a big change but just moving those boxes gives me a bit more view of the stamp shelf in the corner and widens my "space." It's made quite a difference. Enough that I actually made a card today. Score!
Hope to talk to you again soon!
Ingredients:
Stamps: Feeling Sentimental, Much Appreciated: Stampin' Up
Ink: Bliss Blue, Night of Navy: Stampin' Up, Black Momento: Tsukineko
Paper: Whisper White, Night of Navy, Brocade Blue: Stampin' Up
Misc: Mica, Embossing powder: Stampendous, Glass Glitter: Stampin' Up, Copics (to color rhinestones)
Challenges:
Inky Froggies: Blue & glitter
SEI: (silver, thanks, gradation of blues... though my brayering isn't as obvious as I'd like)
Friday, October 25, 2013
May Arts Halloween challenge entry
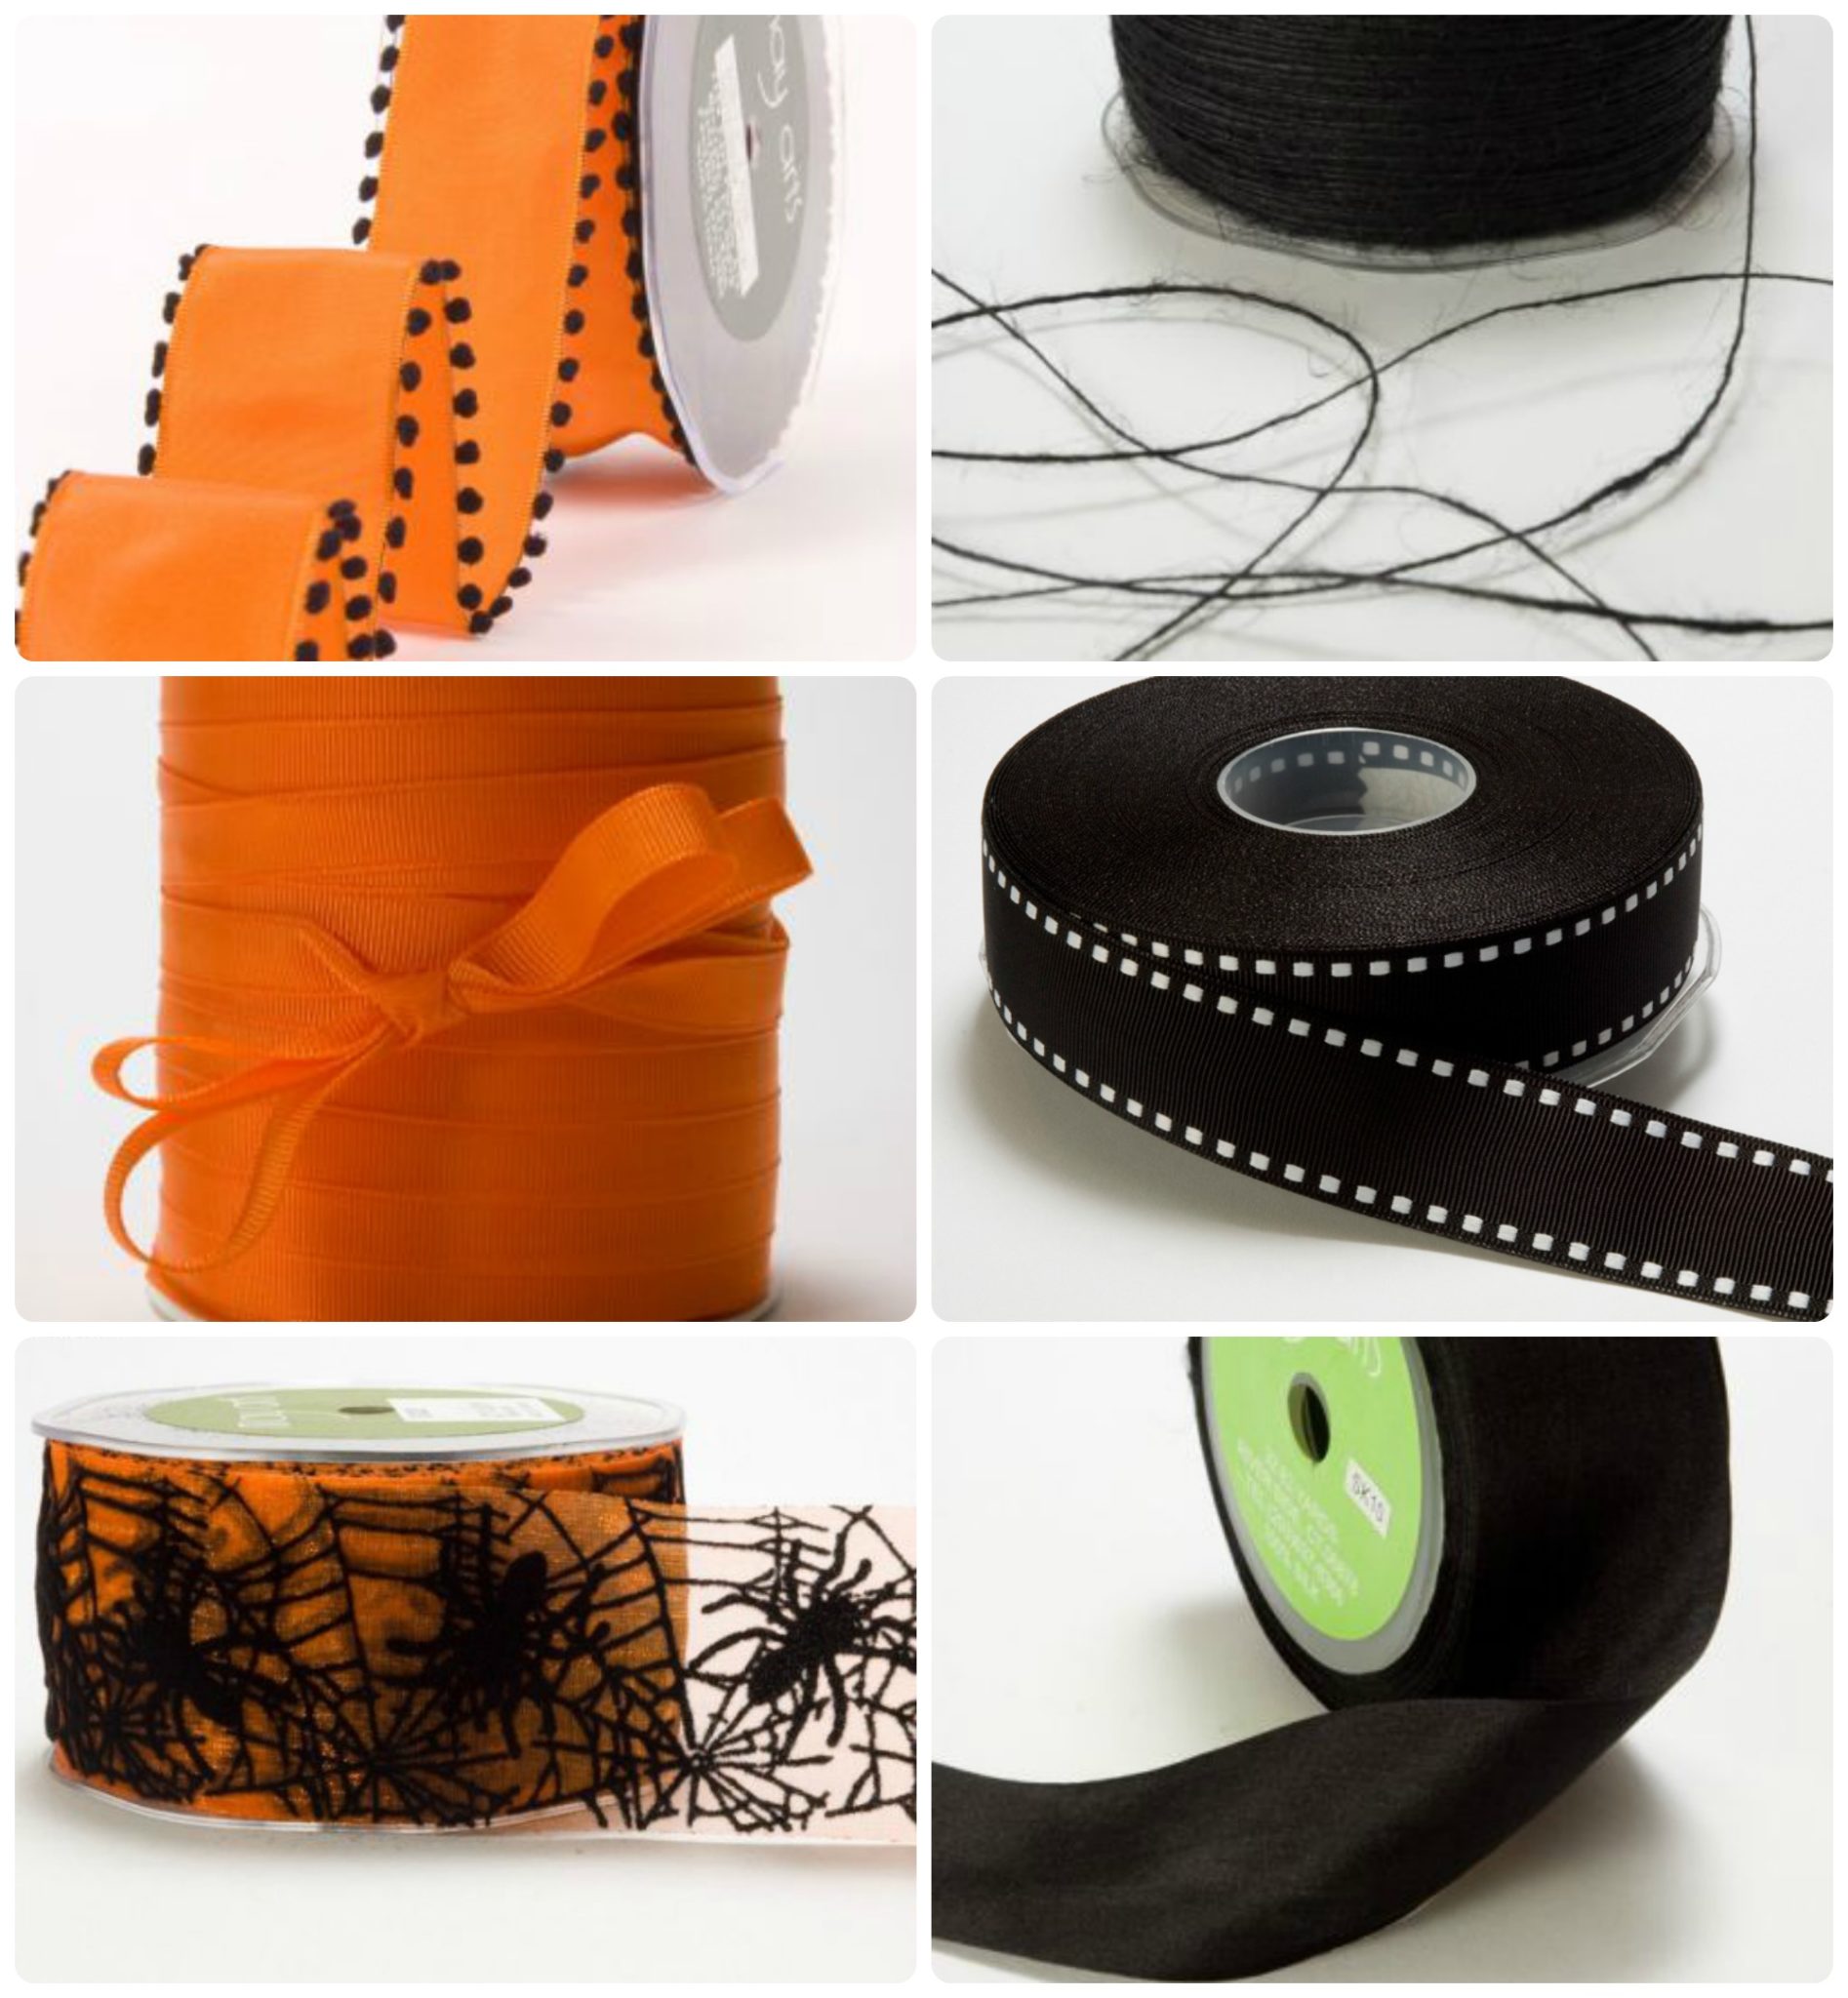
May Arts has been holding some themed challenges lately. Bethney posts a theme and several types of ribbon you can use for it. You submit an idea for a project and she selects 20 participants to receive 2yds of their ribbon choices and make their projects. I was lucky enough to have my witch's hat idea selected this month for the Halloween challenge. She had some delicious ribbons available and I selected 3 of them (you HAVE to use what you select so you don't want to say you want them all unless you know how to use them!)
I loved the ribbons I selected- the spider webbing on the orange tulle-ish ribbon was unexpectedly velvety. It was fabulous! The orange satin/black pom-pom ribbon had a great, firm but flexible wire in it and was stinkin' cute. The black was a bit looser than I expected but made gorgeous flowers.
I picked the hat up at Joann's last year- I absolutely loved the tulle hanging from it. It originally had 2 silver satin flowers attached to it but I cut them off in order to decorate it with the May Arts ribbons. First I wrapped the spider web ribbon around the base of the hat. I considered trying to somehow attach the top edge of the ribbon to the hat so that it followed the conical shape but in the end, I liked it pulled away a bit at the top. I doubled this ribbon over, matching the pattern, so that the orange was a bit brighter against the black of the hat- I really wanted it to stand out. There was enough left over that I was able to make a bow with hanging ends.
I used the orange pom-pom ribbon to make a gathered flower and a twisted rose. The gathered flower is large enough that I put a spider I glittered into it. I also glittered the edge of the black ribbon with some sticky strip tape and fine orange glitter. There was enough of the ribbon that I was able to make two of each of the gathered flowers and roses. On the gathered flowers, I pulled the ribbon a bit differently and you can see the two different results in the large black flowers. I'm happy to say that I used all of the ribbon in its entirety.
I hot glued everything to the hat and added two more spiders and a crow to finish the look. Yes, the crow is attached. The wire in his feet was actually enough to punch through the hat and keeps him upright.
I'm looking forward to wearing this on Thursday to the Halloween party over at our Taekwando school!
To see all of the entries, head over to the May Arts blog.
Viewtainers winner!
Rhonda, come on down! You're the next winner on Jen's Sporadic Giveaways!!!
Shoot me an email with your address to jgerwigdively@hotmail.com and I'll get it over to Viewtainers. Congrats! And thanks to everyone for entering and spreading the word!
Friday, October 18, 2013
Funky cool storage containers + GIVEAWAY
Have you seen these cool storage containers from Viewtainer?
I've been following them on Facebook for a while now and they look really useful. They come with a squeezy top so you can get the goods out without having to actually open the lid each and every time.
They're all cylinders and while most seem to range from 2x4" to 2.75x12", you can also get non-squeezy lids and custom order longer tubes. And, if you can't tell from the photos here, they come in scads of colors!
They're great for storing pretty much anything you can think of. I imagine I'd have to duke it out with my hubby since he'd want to use them to store screws, bolts, nails and every other little tool bit floating around our garage.. And I KNOW my 6yr old would want some. He LOVES containers. I can only imagine the things he'd want to do with them- pretend mailboxes, dropping in counting items and magnetic letters, etc. I'd like to see him use them to keep his craft supplies and toys in- buttons, pom poms, foam pieces, little Legos, dinosaurs and and and. Personally, I'd like them for MY craft room- eyelets, brads, buttons, small flowers, Scrabble tiles and dominos, colored pencils whose box was destroyed... yeah, and, and and. Oh yeah. And my candy stash. LOL!
I've also seen some used as travel containers (travel sized lotions and such!), pet snack storage, and emergency medical kits- great for Bandaids!
Of course, don't forget you can decorate the Viewtainers too. There's this blinged out one posted on Viewtainer's site by Dawn. Fun!
So. Have you seen these? Tried them? You can now get them at Scrapbook.com and Amazon.com. Some Home Depots and Sears also stock them though you'll need to check. Unfortunately, neither of those stores in my area has them at this time.
Would you LIKE to try them? Viewtainer has offered to send one of my readers a 3-pack of Viewtainers! Yay! Because of shipping costs, this giveaway is limited to the US. To enter, please leave me a comment telling me how you've either used Viewtainers or how you'd like to... or both! :) The giveaway will close at midnight EST, Thur. Oct. 24 and I'll announce a winner soon thereafter. Promise! I hate entering giveaways and having to check back for weeks to see if I won- I definitely won't do that to you!
I'd also suggest you like Viewtainer on Facebook- it's not uncommon to find a giveaway happening over there!
For more great ideas on how to use these, check out Viewtainer's Facebook page, blog and especially, their Pinterest site.
Viewtainer sponsored this post and I'm receiving compensation for it. However, all opinions are 100% my own.
Monday, October 7, 2013
Christmas Tags
I've been wanting to make some tags for Christmas for some time so when I got the Kraftin' Kimmie "Build Your Own [Christmas] Trinkets" and "Sleigh Mail," I knew it was time. When Kraftin' Kimmie ran a WCMD challenge of "Tags," I stopped putting it off. Obviously these are uber-simple but I wanted something that I could spend a bit of time stamping and trimming out layers for and then could quickly mass produce with a bit of variety.
Ingredients:
Stamps: (Sleigh Mail, Build Your Own Trinkets): Kraftin' Kimmie, (Holiday Tag Team: To/From): Stampin' Up
Coloring: (Distress Markers): Tim Holtz, (White gel pen): Uni-ball, (Gold gel pen): Unknown
Embossing Powder: Clearsnap & Stampendous
All ink, papers: Stampin' Up
Challenges:
Kraftin' Kimmie: Tags
Paper Girls: Stitching
It's a bit hard to see but all of the tags have faux stitching around the edges to finish them off a bit more. I realized looking at this photo that I forgot to add bling to some of them. Oh well, next time. And there will be a next time- I definitely need more of these little cuties!
Ingredients:
Stamps: (Sleigh Mail, Build Your Own Trinkets): Kraftin' Kimmie, (Holiday Tag Team: To/From): Stampin' Up
Coloring: (Distress Markers): Tim Holtz, (White gel pen): Uni-ball, (Gold gel pen): Unknown
Embossing Powder: Clearsnap & Stampendous
All ink, papers: Stampin' Up
Challenges:
Kraftin' Kimmie: Tags
Paper Girls: Stitching
Sunday, October 6, 2013
Halloween tag
I picked up a fabulous set of Close to My Heart Halloween label stamps at the Stamp, Scrap & Art Tour this summer and last year I found a must-have pack of K&Co. shaker stickers at Michaels. It's one of those things you desperately want to hoard and never let go of because they're just so darn cool but then what's the point? I stamped the 3 images twice each, rubbed them with walnut ink, stacked them and used SU's Crystal Effects on the top layers. Unsurprisingly, the stamped labels bled out a bit but I don't mind it too much with this tag- it just makes them look a bit older and blurrier. I rubbed the distress inks into the ribbons and the kraft tag.
Ingredients:
Stamps: Close to My Heart. Hampton Arts
Paper: Kraft (tag) & brown (reinforcement circle): Stampin' Up
Ink: (Peeled Paint, Walnut Brown, Marmalade Orange): Tim Holtz, (Black Momento): Tsukineko, (Pumpkin Pie, Garden Green, Chocolate Chip): Stampin' Up
Ribbons: Unknown white & black striped, twill seam binding (both colored w/ the TH Distress inks)
Misc: (Sticker): K&Company, (Rub-ons): Creative Imaginations
Challenges:
Pumpkin Spice: Brown & Green
The Stamping Boutique: Halloween
The Corrosive Challenge: Cute and Creepy
Ribbon Carousel: Halloween
The Kraft Journal: Sketch: I went VERY loose on this but the circle and the pointed piece are the Elixir and Potion pieces and the bottle and Owl Cream pieces make up the rectangle.
Saturday, October 5, 2013
Kraftin' Kimmie Halloween Card
Happy World Card Making Day all!!!
Kraftin' Kimmie's weekly challenge this time around is "Spooky Sweet." While I don't have any KK Halloween stamps per se, Charlotte is tweeky enough to do the job nicely.
Ingredients:
Stamps: Kraftin' Kimmie
Papers: CS: Stampin' Up, Designer: Pebbles (Thirty One)
Coloring: Watercolor pencils (Derwent, Staedtler), Copics
Challenges:
Kraftin' Kimmie: Spooky Sweet
Sarah Hurley: Halloween
The Stamping Boutique: Halloween
The Corrosive Challenge: Cute and Creepy
Sunday, September 8, 2013
First Day of School LO
If you thought I fell off the earth before, I imagine you're sure of it now. Yep. I haven't really done a crafty thing in months. I thought I was getting back into it in June... apparently not. I'm feeling it a bit more now and this time I actually made something that I didn't have to. Hopefully that's a good sign that I'm heading back down a crafty path. The little one is now in kindergarten, TaeKwanDo is simply a part of my life, and while I'm volunteering at munchkin's school, I'm not over-doing it. That should allow me enough time to get done the things I have to do around the house and still get done a bit of memory-keeping and decor-making. I'm not sure my hubby agrees but I actually consider those to be part of my role in our household. I'd like our house to look nice and seasonal, something the hubster enjoys when he arrives home after a long day, and I'd like my son to have scrapbooks to look back on in years to come to help him remember the things he did through his life. I have a photo album from when I was a kid but some of the pages are just that- photos with no remembered story associated with them any longer. The scrapbooks take care of that.
Ok. Now that I've bored you to tears on our first reunion in months, let me share with you what it is that's kicked off of this off again. I usually don't scrap the most recent events but I was in the mood to get Boy's first day of school photos to paper for some reason.
Ingredients:
DSP: October Afternoon
CS: Stampin' Up
Brads: Basic Grey
Accent cards: October Afternoon & "antique" alphabet flashcard
Thickers: American Crafts
Challenges:
Crafting by Designs: Back to School
Apron Strings: Back to School sketch (I went REALLY loose on the sketch)
Friday, June 28, 2013
Billy Blythe Birthday Card
Hey!! Remember me?!?! Thought I fell off the face of the earth? Yeah. Me too. It's been several long months since I've really done any crafting. I pretty much went through a solid creative slump. That paired with extreme family insanity through the spring, some general illness, my wacky thought that I should start Tae Kwan Do (I earned my yellow belt this week), and a vile, nasty infection in a tooth that's had a root canal for years pretty much has kept me away from my craft space for quite a while now. However, I'm starting to get the crafting itch again and I'm feeling guilty for having all of these craft supplies and photos to scrap and doing nothing with either, so I think I may finally get back to it.
I'm hoping this will be my kick-off card. I'm going to use it as a birthday for my son who will be turning 6 in a few weeks (yikes!)

Stamps: Billy Blythe: Kraftin' Kimmie
Paper: Stampin' Up & unknown
Dies: Stars: Simon Say Stamp (Memory Box), Labels Framelits: Stampin' Up
Coloring: Watercolor Pencils: Derwent & Staedtler, Copics
Challenges:
Kraftin' Kimmie: Shaped Card
Stampotique: New Adventure
Subscribe to:
Posts (Atom)