Pages

Friday, October 25, 2013

May Arts Halloween challenge entry

May Arts has been holding some themed challenges lately.  Bethney posts a theme and several types of ribbon you can use for it.  You submit an idea for a project and she selects 20 participants to receive 2yds of their ribbon choices and make their projects.  I was lucky enough to have my witch's hat idea selected this month for the Halloween challenge.  She had some delicious ribbons available and I selected 3 of them (you HAVE to use what you select so you don't want to say you want them all unless you know how to use them!)


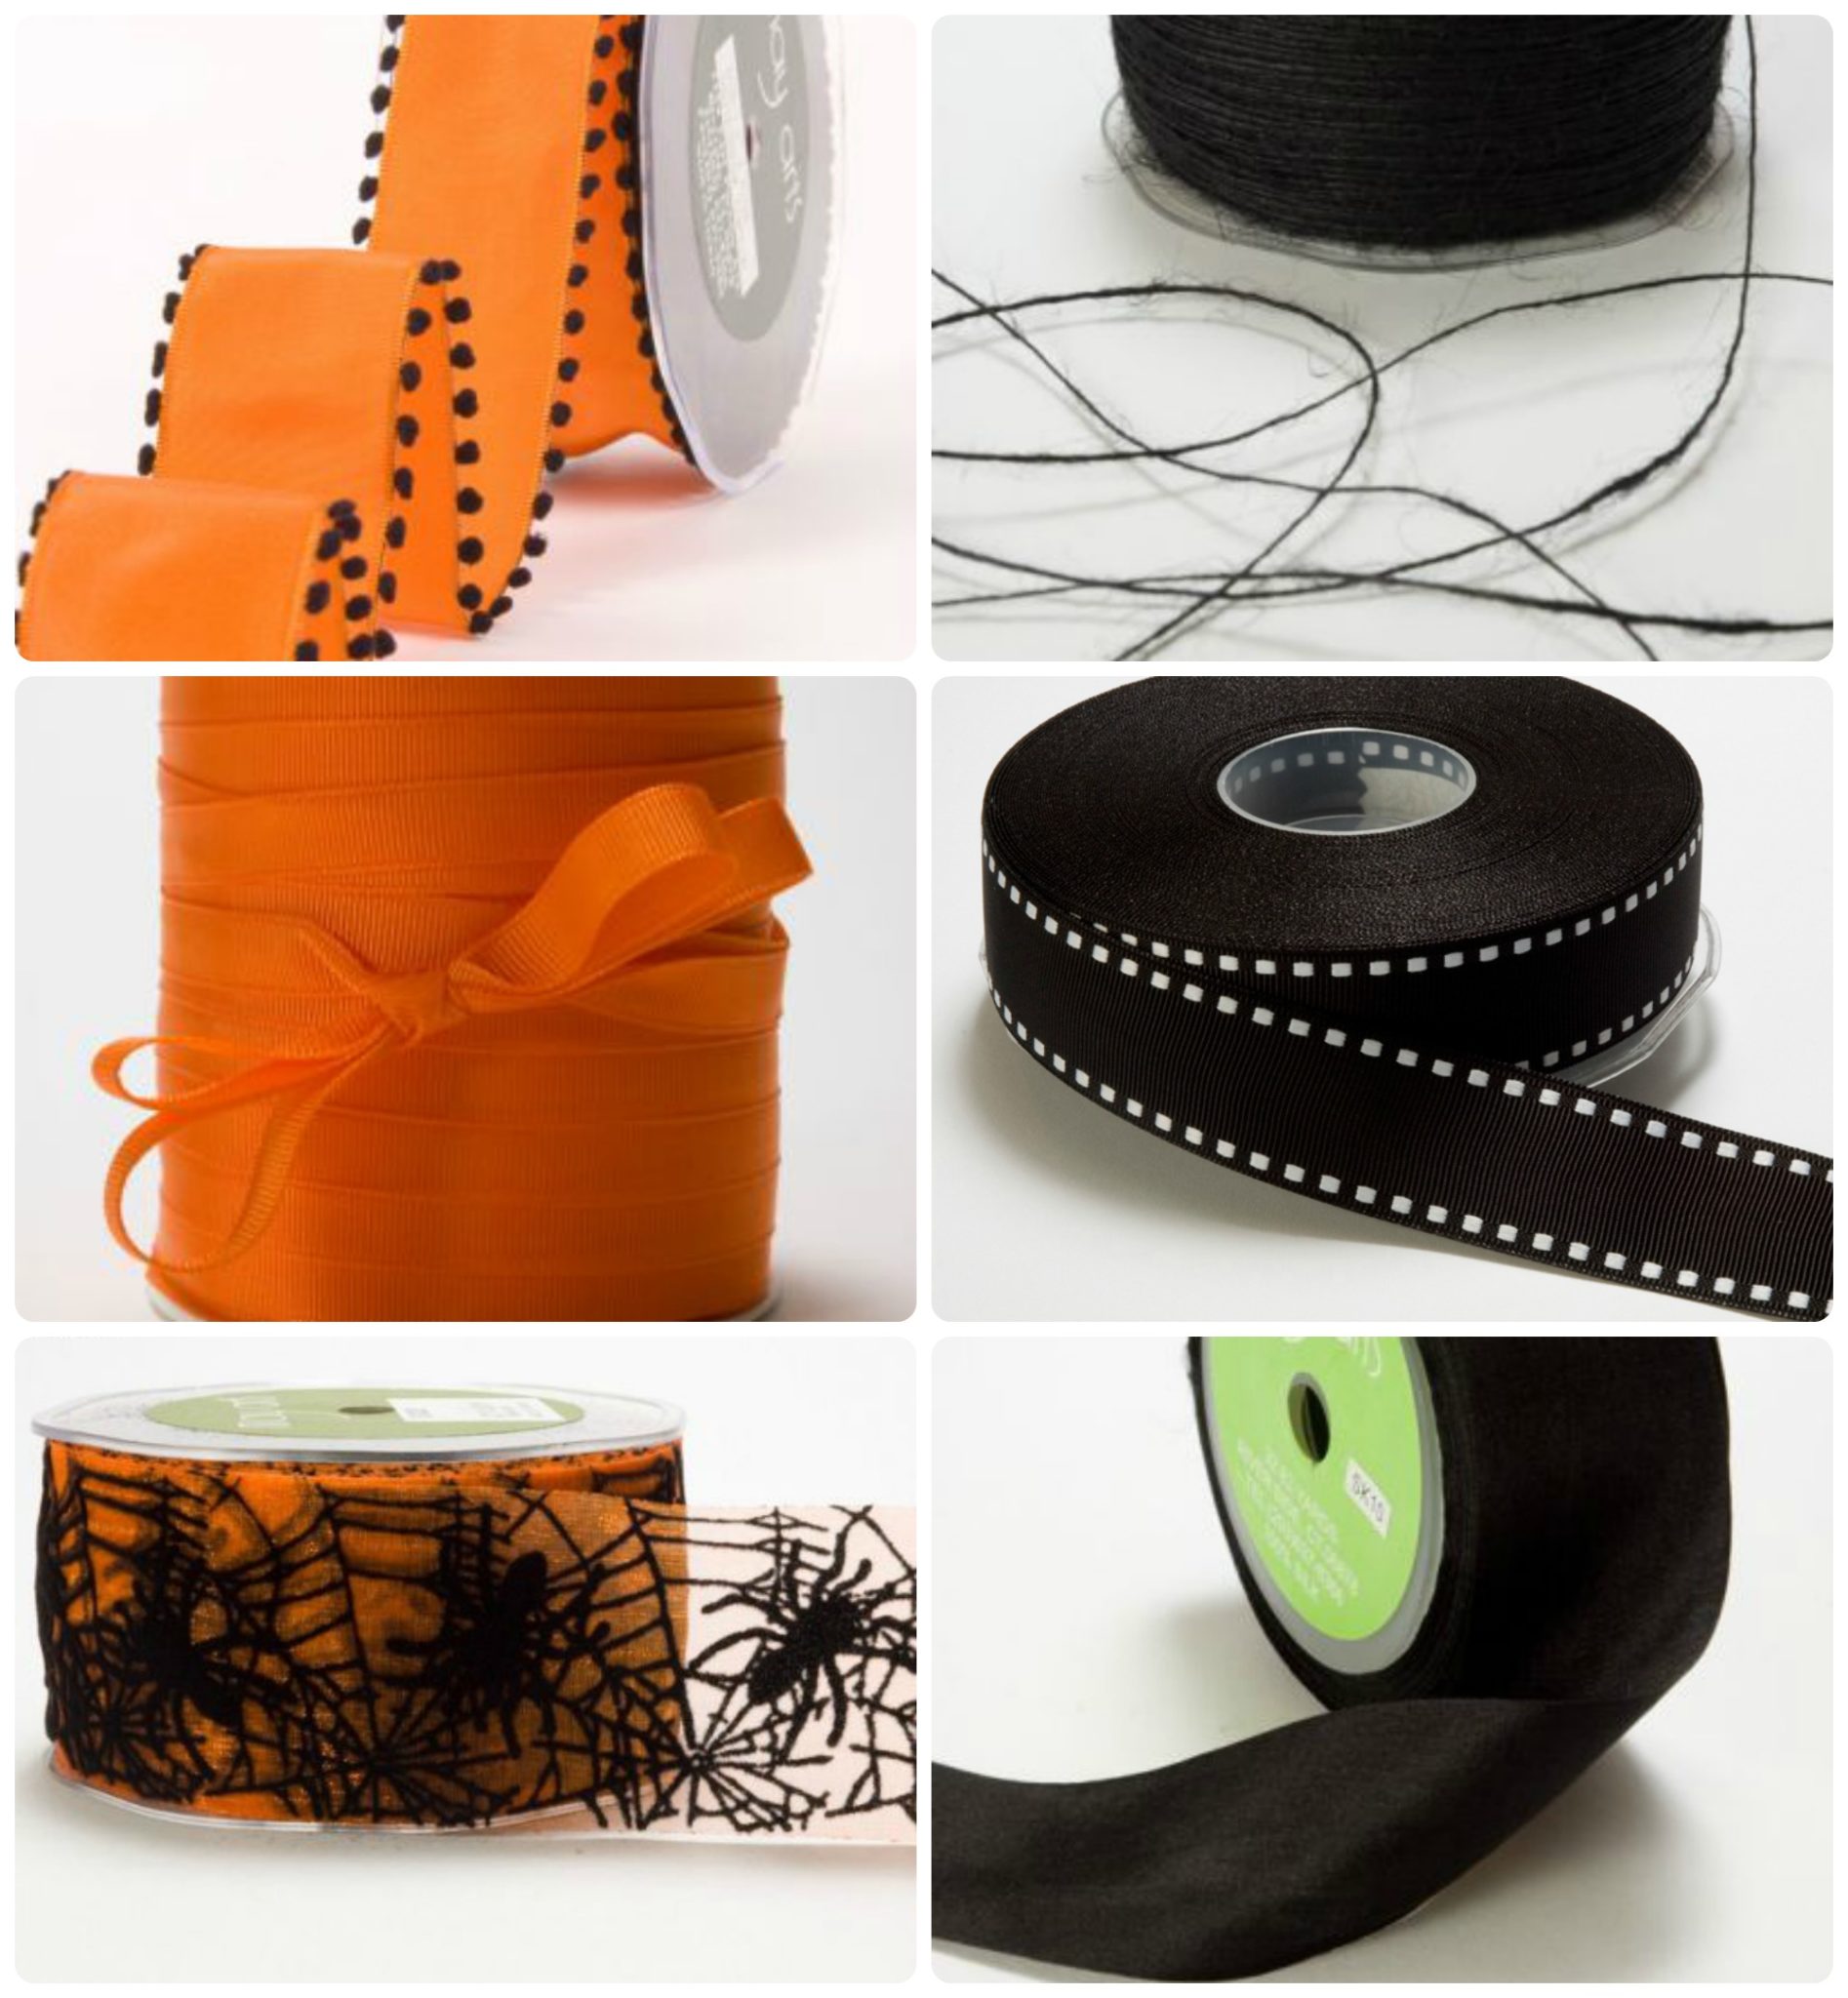
I loved the ribbons I selected- the spider webbing on the orange tulle-ish ribbon was unexpectedly velvety.  It was fabulous!  The orange satin/black pom-pom ribbon had a great, firm but flexible wire in it and was stinkin' cute.  The black was a bit looser than I expected but made gorgeous flowers.


I picked the hat up at Joann's last year- I absolutely loved the tulle hanging from it.  It originally had 2 silver satin flowers attached to it but I cut them off in order to decorate it with the May Arts ribbons.  First I wrapped the spider web ribbon around the base of the hat.  I considered trying to somehow attach the top edge of the ribbon to the hat so that it followed the conical shape but in the end, I liked it pulled away a bit at the top.  I doubled this ribbon over, matching the pattern, so that the orange was a bit brighter against the black of the hat- I really wanted it to stand out.  There was enough left over that I was able to make a bow with hanging ends.


I used the orange pom-pom ribbon to make a gathered flower and a twisted rose.  The gathered flower is large enough that I put a spider I glittered into it.  I also glittered the edge of the black ribbon with some sticky strip tape and fine orange glitter.  There was enough of the ribbon that I was able to make two of each of the gathered flowers and roses.  On the gathered flowers, I pulled the ribbon a bit differently and you can see the two different results in the large black flowers.  I'm happy to say that I used all of the ribbon in its entirety.


I hot glued everything to the hat and added two more spiders and a crow to finish the look.  Yes, the crow is attached.  The wire in his feet was actually enough to punch through the hat and keeps him upright.


I'm looking forward to wearing this on Thursday to the Halloween party over at our Taekwando school!

To see all of the entries, head over to the May Arts blog

Viewtainers winner!


Rhonda, come on down!  You're the next winner on Jen's Sporadic Giveaways!!!

Shoot me an email with your address to jgerwigdively@hotmail.com and I'll get it over to Viewtainers.  Congrats!  And thanks to everyone for entering and spreading the word! 

Friday, October 18, 2013

Funky cool storage containers + GIVEAWAY

Have you seen these cool storage containers from Viewtainer?


I've been following them on Facebook for a while now and they look really useful.  They come with a squeezy top so you can get the goods out without having to actually open the lid each and every time.  

They're all cylinders and while most seem to range from 2x4" to 2.75x12", you can also get non-squeezy lids and custom order longer tubes.  And, if you can't tell from the photos here, they come in scads of colors!

They're great for storing pretty much anything you can think of.  I imagine I'd have to duke it out with my hubby since he'd want to use them to store screws, bolts, nails and every other little tool bit floating around our garage..  And I KNOW my 6yr old would want some.  He LOVES containers.  I can only imagine the things he'd want to do with them- pretend mailboxes, dropping in counting items and magnetic letters, etc.  I'd like to see him use them to keep his craft supplies and toys in- buttons, pom poms, foam pieces, little Legos, dinosaurs and and and.  Personally, I'd like them for MY craft room- eyelets, brads, buttons, small flowers, Scrabble tiles and dominos, colored pencils whose box was destroyed... yeah, and, and and.  Oh yeah.  And my candy stash.  LOL!

I've also seen some used as travel containers (travel sized lotions and such!), pet snack storage, and emergency medical kits- great for Bandaids!

Of course, don't forget you can decorate the Viewtainers too.  There's this blinged out one posted on Viewtainer's site by Dawn.  Fun!

So.  Have you seen these?  Tried them?  You can now get them at Scrapbook.com and Amazon.com.  Some Home Depots and Sears also stock them though you'll need to check. Unfortunately, neither of those stores in my area has them at this time.

Would you LIKE to try them?  Viewtainer has offered to send one of my readers a 3-pack of Viewtainers!  Yay!  Because of shipping costs, this giveaway is limited to the US. To enter, please leave me a comment telling me how you've either used Viewtainers or how you'd like to... or both!  :)  The giveaway will close at midnight EST, Thur. Oct. 24 and I'll announce a winner soon thereafter.  Promise!  I hate entering giveaways and having to check back for weeks to see if I won- I definitely won't do that to you!

I'd also suggest you like Viewtainer on Facebook- it's not uncommon to find a giveaway happening over there!

For more great ideas on how to use these, check out Viewtainer's Facebook page, blog and especially, their Pinterest site.
Viewtainer sponsored this post and I'm receiving compensation for it.  However, all opinions are 100% my own.

Monday, October 7, 2013

Christmas Tags

I've been wanting to make some tags for Christmas for some time so when I got the Kraftin' Kimmie "Build Your Own [Christmas] Trinkets" and "Sleigh Mail," I knew it was time.  When Kraftin' Kimmie ran a WCMD challenge of "Tags," I stopped putting it off.  Obviously these are uber-simple but I wanted something that I could spend a bit of time stamping and trimming out layers for and then could quickly mass produce with a bit of variety.


It's a bit hard to see but all of the tags have faux stitching around the edges to finish them off a bit more.  I realized looking at this photo that I forgot to add bling to some of them.  Oh well, next time.  And there will be a next time- I definitely need more of these little cuties!

Ingredients:
Stamps: (Sleigh Mail, Build Your Own Trinkets): Kraftin' Kimmie, (Holiday Tag Team: To/From): Stampin' Up

Coloring: (Distress Markers): Tim Holtz, (White gel pen): Uni-ball, (Gold gel pen): Unknown
Embossing Powder: Clearsnap & Stampendous
All ink, papers: Stampin' Up

Challenges:
Kraftin' Kimmie: Tags 

Paper Girls: Stitching

Sunday, October 6, 2013

Halloween tag

I picked up a fabulous set of Close to My Heart Halloween label stamps at the Stamp, Scrap & Art Tour this summer and last year I found a must-have pack of K&Co. shaker stickers at Michaels.  It's one of those things you desperately want to hoard and never let go of because they're just so darn cool but then what's the point?  I stamped the 3 images twice each, rubbed them with walnut ink, stacked them and used SU's Crystal Effects on the top layers.  Unsurprisingly, the stamped labels bled out a bit but I don't mind it too much with this tag- it just makes them look a bit older and blurrier.  I rubbed the distress inks into the ribbons and the kraft tag.


Ingredients:
Stamps: Close to My Heart. Hampton Arts

Paper: Kraft (tag) & brown (reinforcement circle): Stampin' Up
Ink: (Peeled Paint, Walnut Brown, Marmalade Orange): Tim Holtz, (Black Momento): Tsukineko, (Pumpkin Pie, Garden Green, Chocolate Chip): Stampin' Up
Ribbons: Unknown white & black striped, twill seam binding (both colored w/ the TH Distress inks)
Misc: (Sticker): K&Company, (Rub-ons): Creative Imaginations

Challenges: 
Pumpkin Spice: Brown & Green
The Stamping Boutique: Halloween 
The Corrosive Challenge: Cute and Creepy
Ribbon Carousel: Halloween
The Kraft Journal: Sketch: I went VERY loose on this but the circle and the pointed piece are the Elixir and Potion pieces and the bottle and Owl Cream pieces make up the rectangle.

Saturday, October 5, 2013

Kraftin' Kimmie Halloween Card

Happy World Card Making Day all!!!

Kraftin' Kimmie's weekly challenge this time around is "Spooky Sweet."  While I don't have any KK Halloween stamps per se, Charlotte is tweeky enough to do the job nicely.

Ingredients:
Stamps: Kraftin' Kimmie

Papers: CS: Stampin' Up, Designer: Pebbles (Thirty One)
Coloring: Watercolor pencils (Derwent, Staedtler), Copics

Challenges:
Kraftin' Kimmie: Spooky Sweet
Sarah Hurley: Halloween 
The Stamping Boutique: Halloween
The Corrosive Challenge: Cute and Creepy 

Sunday, September 8, 2013

First Day of School LO

If you thought I fell off the earth before, I imagine you're sure of it now.  Yep. I haven't really done a crafty thing in months.  I thought I was getting back into it in June... apparently not.  I'm feeling it a bit more now and this time I actually made something that I didn't have to.  Hopefully that's a good sign that I'm heading back down a crafty path.  The little one is now in kindergarten, TaeKwanDo is simply a part of my life, and while I'm volunteering at munchkin's school, I'm not over-doing it.  That should allow me enough time to get done the things I have to do around the house and still get done a bit of memory-keeping and decor-making.  I'm not sure my hubby agrees but I actually consider those to be part of my role in our household.  I'd like our house to look nice and seasonal, something the hubster enjoys when he arrives home after a long day, and I'd like my son to have scrapbooks to look back on in years to come to help him remember the things he did through his life.  I have a photo album from when I was a kid but some of the pages are just that- photos with no remembered story associated with them any longer.  The scrapbooks take care of that.

Ok.  Now that I've bored you to tears on our first reunion in months, let me share with you what it is that's kicked off of this off again.  I usually don't scrap the most recent events but I was in the mood to get Boy's first day of school photos to paper for some reason. 


Ingredients:
DSP: October Afternoon

CS: Stampin' Up
Brads: Basic Grey
Accent cards: October Afternoon & "antique" alphabet flashcard
Thickers: American Crafts

Challenges:
Crafting by Designs: Back to School

Apron Strings: Back to School sketch (I went REALLY loose on the sketch)


Friday, June 28, 2013

Billy Blythe Birthday Card

Hey!!  Remember me?!?!  Thought I fell off the face of the earth?  Yeah.  Me too.  It's been several long months since I've really done any crafting.  I pretty much went through a solid creative slump.  That paired with extreme family insanity through the spring, some general illness, my wacky thought that I should start Tae Kwan Do (I earned my yellow belt this week), and a vile, nasty infection in a tooth that's had a root canal for years pretty much has kept me away from my craft space for quite a while now.  However, I'm starting to get the crafting itch again and I'm feeling guilty for having all of these craft supplies and photos to scrap and doing nothing with either, so I think I may finally get back to it.  

I'm hoping this will be my kick-off card.  I'm going to use it as a birthday for my son who will be turning 6 in a few weeks (yikes!)


Ingredients:
Stamps: Billy Blythe: Kraftin' Kimmie

Paper: Stampin' Up & unknown
Dies: Stars: Simon Say Stamp (Memory Box), Labels Framelits: Stampin' Up
Coloring: Watercolor Pencils: Derwent & Staedtler, Copics

Challenges:
Kraftin' Kimmie: Shaped Card

Stampotique: New Adventure

Sunday, May 5, 2013

Downtown Disney- NSD

There was an NSD challenge over at Big Picture Classes to hand journal.  Since that's pretty much what I do all the time anyway, it was an easy one.


Ingredients:
Papers: Deja Views, Paper Wizard, Stampin' Up
Thickers: American Crafts
Nifty paper clip thingee: Some men's dress shirt

Challenges:
Big Picture Classes: #9: Hand journaling
Pumpkin Spice: Layout


Animal Kingdom Parade - NSD

I've spent National Scrapbooking Day/weekend working on some Disney World layouts.  I've been tackling getting a LOT of pictures onto each spread.  For instance, this one has 32 on it I believe.  The trick is that no one said all of the pictures had to be UNDER the 12x12 page protector or side by side.  Makes a difference.


Ingredients:
Ink, Cardstock: Stampin' Up

Journal Thickers, Stamps, Print paper all from Amy Tangerine's Sketchbook line: American Crafts
Misc: White Gel Pen: Uni-ball, Washi tape: Queen & Co.(?)

Challenges:
Pumpkin Spice: Use washi tape (holding the pictures to the front of the 12x12 protector)

American Crafts/Sweet & Simple: Lots of colors.  Yep.  Got that here.
Basic Grey: Cut out print patterned paper.  Ok.  I'm bad.  This isn't BG paper but I hadn't thought of doing that for this project until I read this challenge and cutting out some of the flowers from a remaining scrap and attaching/popping them worked beautifully for what was on my table, even if it's not BG.  Just wanted to at least let them know I was inspired by the challenge.  (I realized after publishing this that Paige also did the same challenge over at American Crafts)
Big Picture Classes: NSD Challenge #2: Use divided protectors.  Ummm... does it count that I stitched across them, sliced them up and used them as small picture protectors?  I can't see doing the "Project Life" style scrapping when I'm trying to get this many pictures on a spread but the protectors, since they're already sized for smaller photos, work wonderfully, especially when stitched to size them exactly.
Shimelle.com: Favorite American Crafts papers.  These aren't my norm but I love the crazy bright colors.

Monday, April 15, 2013

GIU Wrap Up and Winner!

Before I say anything else, I wanted to thank you all for the comments you left last week.  I generally try to respond to every comment left on my blog but between the number that were left by folks with accounts without email addresses attached to them (meaning I CAN'T email you back) and simply the sheer number of comments left, I'm not able to reply to all of them. 

Quite a few of you left comments and questions that I do want to respond to and since so many of them were repeated, I'll here.  However, the winner of the Itty Bittys first.  Drum roll.....

Gaylynn, congrats!!! (comment left April 9, 2013 at 11:10 AM.)  I'll send you an email about this.

So.  To answer some of the questions/respond to some comments I read last week.

  • What do I think of the Inktense pencils?
I like them.  I have a box of Staedtler watercolor pencils that I've been using for quite a few years but I really wanted to try the Inktense ones after hearing so much about them.  I will say I was thrilled thrilled that I had an ACMoore coupon and gift certificate when I bought them.  I'm not sure I'd want to pay what they usually cost- they're darn expensive.  However, they do blend beautifully and have a great intense color to them.  I love the range of colors that are available.  I only picked up the 12pc tin to start but I can see myself getting more... with a coupon.  :)
  • Why color on the back of the acrylic sheet when the stamped image is on the front? (Friday's ornaments card)
There's actually 2 reasons for this.  First, sometimes when you color, the markers will smudge or erase the line or another color.  Sharpies are particularly prone to doing this.  Second, even if the line stayed intact, lets face it.  No one stays in the lines all the time- sometimes you color on the line.  If you were seeing that side of the image, the coloring may overpower the line.  However, if you color it and then flip it back over, the black line is always on top of the colored image and therefore, the line appears crisp and clean.
  • I'm a sucker for fussy cutting.  Only 2 of the 10 cards last week weren't fussy cut.  Sometimes it's intentional, sometimes it's how I deal with a botched coloring job or other mistake (washi tape embossing gone bad for instance.)  
  • I haven't done much paper piecing but with the little fussy cutting fetish I seem to have, I don't know why I don't do more.
  • My favorites last week were the pieced mushroom and the torn underwear (I probably giggled the whole time I made that one.)  They also seemed to be the two projects that got the most comments.
Again, many thanks for your comments last week!  I appreciated them all!


Friday, April 12, 2013

GIU- Day 5

Happy Friday all!  Thanks for joining me for my last Growing in Unity day!  As you know, I've been doing two cards a day from Unity stamps I hadn't inked and today is no exception.  Well, it wasn't supposed to be.  However, things can only go right so many days in a row before something's likely to go wrong.  Day 5 is apparently the day where it goes wrong.  Figures, right?  Murphy couldn't keep his fingers out of it and the law of averages determined that four days was enough.  SO.  Welcome to something a bit different.

I wanted to use "A Little Bit of Washi" for today's cards.  The first one, not so bad.  The second, not so good.  A technique I've really wanted to try is embossing on black- I've seen some stunning projects done that way.  It went splendidly until I got to the last 2 "tape" lines.  Yeah.  Murphy.  Turns out that my red EP is too dark to use on black.  Purple wasn't spectacular either so I played with it.  While I didn't finish a card from the piece, I did grab a picture of it so you can see where I was going with it.


Great idea.  Not so great execution.  So.  The first card.  I was going to do this as a one-layer card but it turned out that I must have had red ink on my fingers because once I was finished with the original, I saw a smudge.  And then a fingerprint.  And then a smudgy fingerprint.  MMURRPPHHHYYYYYY!  So.  I did another fussy cut project.  Of course, it was somewhat blah on a plain background so I added some yellow stitching.  Didn't stand out.  Red stitching with the yellow.  Too bold- overwhelmed the yellow.  Let's add green.  While we're at it, what the heck, do 'em all. 

Next!  There were actually a few sets I wanted to try so this gave me the chance to pull in another.  "Ornamental Season" is one I got but hadn't used because I really wanted to spend a bit of time making it pop and when mass producing my Christmas cards, that's not real time-effective.  I stamped the image with Staz-On onto a scrap of plastic from a report cover.  I colored the back of the sheet with Sharpies and a silver paint pen.  


Well, I'll say it for the last time.  Please make sure you leave comments for me on all of this week's GIU posts.  I'll be drawing a winner from all comments on Sunday and the winner will get two Itty Bittys of their choice from Unity.  Good luck! 


Ingredients:
Stamps: (A Little Bit of Washi, Ornamental Season): Unity

Ink: (Silver, Black Staz-On): Tsukineko, (Real Red, Only Orange, Summer Sun, Green Galore, Brilliant Blue, Concord Crush, Lovely Lilac): Stampin' Up
Paper: Stampin' Up
Misc: (Embossing folder): Sizzix, Sharpies, (Embossing powders): JoAnn's, Washi (the black strips of washi are real): Unknown

Challenges:
The Paper Players: #140: Something recycled/repurposed (plastic sheet from report cover)

Jingle Belles: Earth Day Special (there's that report cover again!)

Thursday, April 11, 2013

GIU- Day 4

Happy Thursday all!

I have two more cards for you today, both a bit simpler than some of my previous projects.  This set has cracked me up since I first saw it and I had to ink it up this week.  Had to.


By the way.  If you're planning to do faux stitching and can't lay your hands on a white gel pen, a very fine paint brush and white acrylic do a nice job.  Granted, some of the stitches will come out a bit thick but then again, you've never seen what damage I can do with a sewing machine.  Just sayin'.

Please make sure you leave comments for me all of this week.  I'll be drawing a winner from all comments on Sunday and the winner will get two Itty Bittys of their choice from Unity.  Good luck!


Ingredients: 
Stamps: (Change is Good): Unity
Paper: Designer Paper (1st card): DCWV, (2nd card): My Mind's Eye, (Cardstock): Stampin' Up
Ink: (Basic Black, Whisper White): Stampin' Up
Misc: (Watercolor pencils): Staedtler

Challenges:
The Sweet Stop: Sketch SSS205:

Wednesday, April 10, 2013

GIU- Day 3

Welcome to Growing in Unity, day 3!  Today I used the "Slow and Steady" stamp- I love this whimsical image.


I was lucky enough to win a Simon Says Stamp April 2013 card kit from Jennifer McGuire's blog (Thank you!) and the majority of the materials used on the yellow/print card are from that kit.  I wanted to do a paper-piecing card and this kit was just perfect for it.

Please make sure you leave comments for me all of this week.  I'll be drawing a winner from all comments on Sunday and the winner will get two Itty Bittys of their choice from Unity.  Good luck!


Ingredients:

Stamps: (Slow & Steady, Quotes a'la Happy, Splendid Things): Unity
Papers: (Patterned Papers): Fancy Pants, (CS): Stampin' Up,
Ink: (Basic Black): Stampin' Up
Misc: (Watercolor pencils): Staedtler, (Enameled Stripe Heart): Queen & Co, (Pearl pen): Viva Decor

Tuesday, April 9, 2013

GIU- Day 2

Sorry if you saw an early version of this post yesterday.  It got away from me before I managed to schedule the post time.  The joys of computers.

Anywho.  Welcome back!  For today's Growing in Unity projects, I used the fun "Halloween Greetings" set.  LOVE the witchy gal!


I've been wanting try coloring on kraft paper and I just picked up a small set of Derwent's "Inktense" pencils so this was the perfect opportunity.  Of course, after doing a more muted card, I wanted to do a bright one also so there's card #2.

Please make sure you leave comments for me all of this week.  I'll be drawing a winner from all comments on Sunday and the winner will get two Itty Bittys of their choice from Unity.  Good luck!

Ingredients:
Stamps: (Halloween Greetings): Unity
Papers: (CS): Stampin' Up, (Designer papers): Stampin' Up, My Mind's Eye, Graphic 45, Target
Misc: (Green glitter glue): Studio G, (Watercolor pencils): Staedtler, Derwent

Challenges:
The Kraft Journal: Favorite kraft project of 2013

Monday, April 8, 2013

GIU- Day 1

Hi all!  For those of you joining here this week for my "Growing In Unity" week, welcome!  To those of you who are normal subscribers, hey!  It's me!  I'm still around!  I know it's been a long time but I've been busy and without any crafting mojo whatsoever so I just took some time off to see if I could get it moving again.  Turns out that it needed a bit of a jump-start to get going.  Due to an immediate need to spend time with her family, this week's original GIU Gal needed to switch with someone so I moved to this week from the end of Sept.  Nothing like forcing yourself to be crafty if it doesn't seem to want to come on its own.

When I was planning my projects, I decided I wanted to use some stamps I haven't had the chance to ink.  Then, I couldn't decide what style I wanted to make the card in so I jumped at the idea of making two cards for each day, both with the same stamp or very similar ones from the same set.  It's been rather fun working on the two cards simultaneously.

So.  Day 1.

I kept these two rather simple because of the bold colors and images.


The first one I inked the stamp, misted it with water and then stamped on dry watercolor paper.  I wasn't entirely thrilled with the result so I did go back and mist the stamped image lightly to increase coverage.  The second one was done the same but on damp watercolor paper.

Please make sure you leave comments for me all of this week.  I'll be drawing a winner from all comments on Sunday and the winner will get two Itty Bittys of their choice from Unity.  Good luck!


Ingredients:
Stamps: (Donna Downey's Poppies, With Sympathy): Unity
Paper: (CS): Stampin' Up, (Watercolor paper): Royal Langnickel
Ink: (Fired Brick Distress): Tim Holtz, (Basic Black, Whisper White. Summer Sun): Stampin' Up
Misc: (Black Diamond Stickles): Ranger, (Fan embossing folder): Stampin' Up

Tuesday, February 12, 2013

Quick birthday card

So I got all of the Valentine's made and mailed.  I have my hubby's bday present in hand... have since Christmas actually though his bday is today.  I realized though that I had no bday card and no Valentine's gift for him.  *sigh*  So.  The card is made and I guess I'll make a quick trip out tomorrow for a Vday gift.

Stamps: All Paper Smooches: sentiment & cupcake freebies, tag from Qwik Qwips
Paper: (Whisper White, Real Red (beind heart punch)): Stampin' Up, (Blue Awning): K&Co.
Twine: The Twinery
Misc: Copics, Heart punch

Challenges:
Paper Smooches: Heart

Shopping Our Stash: Birthday (I've had that print paper here for about a year and just untaped it today)

Saturday, February 9, 2013

MORE Valentine's Day Cards!

I'm sure it comes as a surprise... NOT!

First, I saw an interesting sketch over at CARDs that I wanted to try out.  I went with a rectangular shape rather than square to make it more mailable.  It's one of those cards that looked better in my mind than it did once it hit paper.  However, the hubby loves it and it's for his mom so yay me!  LOL!

Ingredients: 
All paper: Stampin' Up
Ink: Stampin' Up, Distress Marker
Punch/Die: Stampin' Up

Challenges:
CARDS: 


This was the card that was a bit delayed on.  I wanted a smaller doily and bought some new ones... and ended up liking my old ones a lot better.  Figures.  Credit where credit is due- saw this card from Lea and HAD to case it!

Ingredients:
Papers, ink, dies: Stampin' Up
Stamps: (Banner): Stampin' Up, (Happy Valentine's Day): Repeat Impressions
Doily: Wilton
Hat Pin: Ellen Jarvis @ Card Monkey
Twine: Divine Twine
Washi: ACMoore

Challenges:
Pumpkin Spice: Valentine's
Scrapbooker's Paradise: Loved One

The Kraft Journal: Favorite kraft project of 2013

Thursday, February 7, 2013

Chalkboard Valentine

Valentine's cards, part deux.  Yesterday I saw a card on Moxie Fab that dropped my jaw.  I wanted to make one.  I wanted to make one BAD.  I started on kraft paper and it just looked a bit blah. .)


That's as far as I got before I started to set it aside so I could start on card 4 (yeah, 4.  2 is on the back burner until I get a doily).  Another thing I've wanted to try recently is the chalkboard technique.  Then, DUH Jen!  Those gems and such would pop quite nicely on black!  So here's the result:


I used Betsy Veldman's chalkboard tutorial.  Obviously I went for the VERY smudgy look.  LOL!

As an aside, my "Tip of the Day": Something I found that worked well was to use something clear (I used a stamp block was nice since it didn't roll under the weight but a sheet of acetate would have been good too) to line up my buttons and bling over the card.  Some of the bling was sticky backed so unless I'd cut it out, it would have been difficult to put on the paper and shift until I got it where  I liked.  It definitely simplified the layout process and when I changed cards, I already liked the "bling layout" so I was able to just put the block to the side and then put it back in place for final tweaks when the black card was done.

Ingredients:
Ink: (Whisper White): Stampin' Up, (VersaMark): Tsukineko

Stamps: (Love): Stampin' Up, (Happy Valentine's Day): Repeat Impressions
Bling: Creative Charms, Studio 18, Walmart, Bazzill, Stampin' Up, Vintage buttons
Misc: (White colored pencil): Crayola

Challenges:
Apron Strings Day #2: Old bling, new paper.  The paper came last week in my Stampin' Up order and some of the bling is the first bling I bought and several buttons were my grandmother's.  

Southern Girls: Bling it On
Top Tip Tuesday: Let Me Call You Sweetheart